
Kinipela Backyard Putting Green
USGA Green
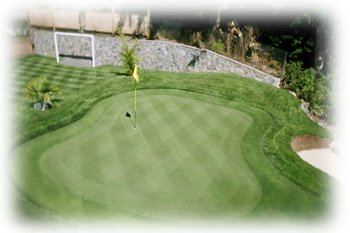
One of the main reasons I picked perennial Poa annua for my putting surface was the climate here in Victoria B.C. The average low in winter time is 1c (37'f) and the average high in summer is around 24c 72'f), ideal growing conditions for Poa. There are three kinds of ecotypesof Poa – annual, biennial, and perennial. Perennial being the best because it’s the strongest out of the three and it produces the least amount of seed in the spring. Annual being the worst because of the large amount of seed production which produces a bumpy putting surface and is the weakest of the ecotypes. (Merrill J. Francis, CGCS) If I went with a bentgrass greenafter the first season I would have the wrong kind of Poa (annual)of turf growing on the putting surface, I want my green to be as consistent as possible. I know Poa and bentgrass can coexist together but they do better at different times of the year, Poa during fall, winter, and spring and bent during summer. I like the growth characteristic of Poa – thick, dense, up right turf, what I want for my putting surface. I know growing one of the most finicky types of turf on a sand base green will push my turf skills to the limits. I look forward to the challenges ahead. I followed the U.S.G.A. guidelines to the best of my ability to insure that my Poa green would be successful, and with doing all turfgrass cultural practices my green will have great color, health, and vigor. |
 |
Left: I used a garden hose to help me with picking a shape for my green. The pole in the ground is the middle of the green. Right: My budget was almost non-exsistent so any digging had to be done by hand instead of a machine. I had to dig down 18", 4" for the pea stone layer, 12" for the root zone mix, and the last 2" for the poa annua cores. The material that was coming up was a sandy loam with chunks of clay. I screened this material beacuse I needed it for the kid's area, it meant more work, but the more material that I could use on site and not have to haul away the better. |
 |
 |
Left: Again "Murphy's Law" would raise his ugly head. This time it was a huge boulder in front of my green. You could see by the plywood board where my main drain line is and where the big rock sits, it had to go. The rock size was 4.5' long x 2.5' wide x 4' deep. It had to be blasted out. Right: The rock has been removed and I have the top right part of the green to be picked out. |
 |
 |
Left: The green cavity is finally picked out.. It took one month to remove 22 yards of material with a pick and shovel. Right: I have a 1% slope from back to front ( the bottom of the picture is the front ) and .5% slope from left to right. I rolled the sub surface quite a few times, took out the high areas and filled in the low ones. Once I was happy with the subsurface I painted the drain lines in. |
 |
 |
Left: The drain lines have been picked out and cleaned, then Pea stone dress the bottom of the trench, then the 2” perforated pipe was centered in the trench, then stone to the top. Right: Looking from the back to the front of the drain lines. |
 |
 |
Left: I fixed all the blemishes on the subsurface with the back of my landscape rake, then rolled a few more times. Right: Wooden stakes were hammered into the subsurface, the distance between the stakes was random, I just want enough room between the stakes to maneuver my wheelbarrow around. |
 |
 |
Left: I took my tape measure out and measured 4” up on each stake then made a mark, then I started hauling the pea stone in. After a large area of stone was dumped I would use the back of the landscape rake to rake it to the 4” mark. I put these plywood boards on the subsurface so my wheelbarrow tire would not create ruts. Right: ¾ of the green is done. |
 |
 |
Left: All the pea stone is down, then I roll and water, then rolled again. I did this to compact and to firm things up. Right: Mixing the root zone mix, I didn’t have the budget to get it professionally mixed so I used the bobcat. The ratio was 80% sand (medium size) and 20% Natures Gold (organic material) I would make up 2 yards at a time, I would spend around 10-15 minutes mixing it like this. |
 |
 |
Left: The root zone mix going in, looks great. My truck could only handle two yards at a time so it took a few trips to bring in 23 yards. Right: looking from the back to the front of the green. |
 |
 |
Left: All the root zone mix is down and rolled a few times looks great. At this point of the project I was getting very pumped up, you could start to see everything coming together, just a few more stages to go and I would have grass growing on the green. Right: I used this product Axis in the top 5” of the root zone mix. It helps with water and air movement in the soil, it helps resists compaction and helps with drainage in the root zone mix. |
 |
 |
Left: The white product you see is Axis. I worked Axis into the top 5” of the root zone mix then I level it out then rolled it. Then I dragged a leaf rake across the root zone mix to rough it up, then I put down fresh Poa annua cores. Right: The green is half done. I used the plywood boards on the surface so the wheelbarrow tire wouldn’t rut the root zone mix. |
 |
 |
Left: April 29/02 and all the Poa cores are down. I put out one pound of Rye grass seed, then a light topdress of sand then I rolled in four different directions. I threw the Rye seed down because I wanted a quick canopy of grass and in time the Poa will push out the Rye leaving me with a 100% Poa annua green. Right: The collar and approach has just been turfed. |
 |
 |
Left: May 5/02, there is little green fuzz all over the green, hard to see in the picture. Right: May 15/02, first cut at ¼” with my Toro 1000, it has been 16 days since the cores went down. |
 |
 |
Left: May 23/02, my first cut at 3/16” looks alright. I have thin areas all a long the outside of the green, these areas in time will knit together. Right: The next day I did my first topdress with sand. For the rest of the growing season I went every 2.5 weeks with a light topdress. |
 |
 |
August 1/02, I was very happy with how the putting green turned out, the height of my green when this picture was taken was 1/8” or .125”. The green size is 525 sq. ft. At the beginning of September I started to raise the height and started to harden off the grass plant, by October 1/02 my winter height is ¼”. |
 |